The printed banner is only half of a step-and-repeat. The other half is the stand holding it up and the ten minutes of setup before the first photo, and that half is where good artwork quietly gets ruined. A backdrop that sags in the middle, sits too low so heads clip the top edge, or throws flash glare back at the camera will show that flaw in every single frame, no matter how sharp the logos are. The fix is not more money on the print; it is choosing the right stand, sizing it to the banner, and rigging it with a little care. Here is how to do all three.
The stand is the part people forget to budget for
Four systems cover almost every event. Adjustable telescopic stands are the workhorses: their poles extend in both width and height, so one stand handles a range of banner sizes and venue footprints, which is exactly what you want if you run recurring events in different rooms. Pipe-and-base systems use heavy aluminum bases and are the sturdiest option for large or tall backdrops that need to stand still in a busy space or a light breeze. Pop-up frames attach the graphic with velcro and go up in minutes, so they win when portability and speed matter more than maximum size. Tension fabric stands stretch a printed fabric over a frame for a smooth, wrinkle-free face with no hardware showing.
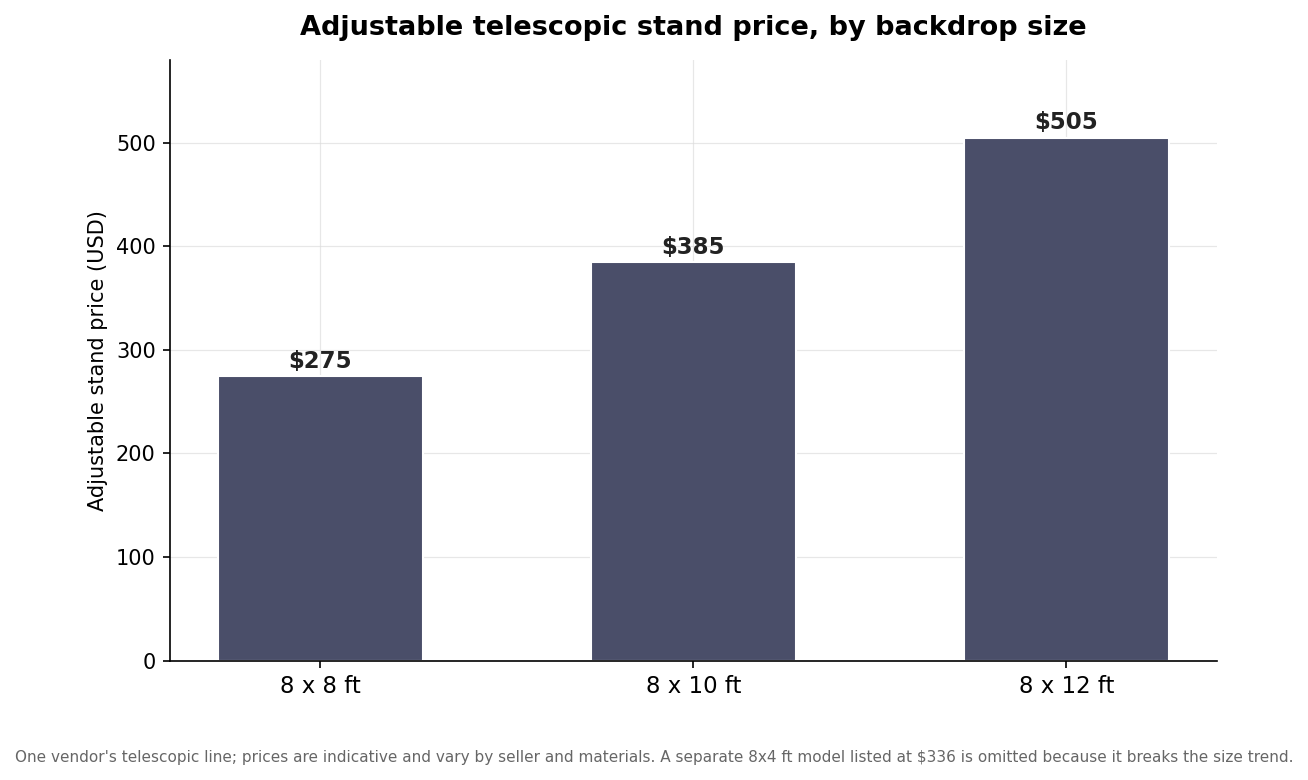
Price tracks size more than anything else. Within one vendor’s telescopic line, an 8-by-8-foot stand runs around $275, an 8-by-10 around $385, and an 8-by-12 around $505, so widening the backdrop by two feet at a time adds roughly a hundred dollars to the hardware. Treat those as indicative, but budget the stand as a real line item rather than an afterthought, because a cheap stand under a good banner is the most common way the whole setup looks amateur.
Size the stand to the print, with range to spare
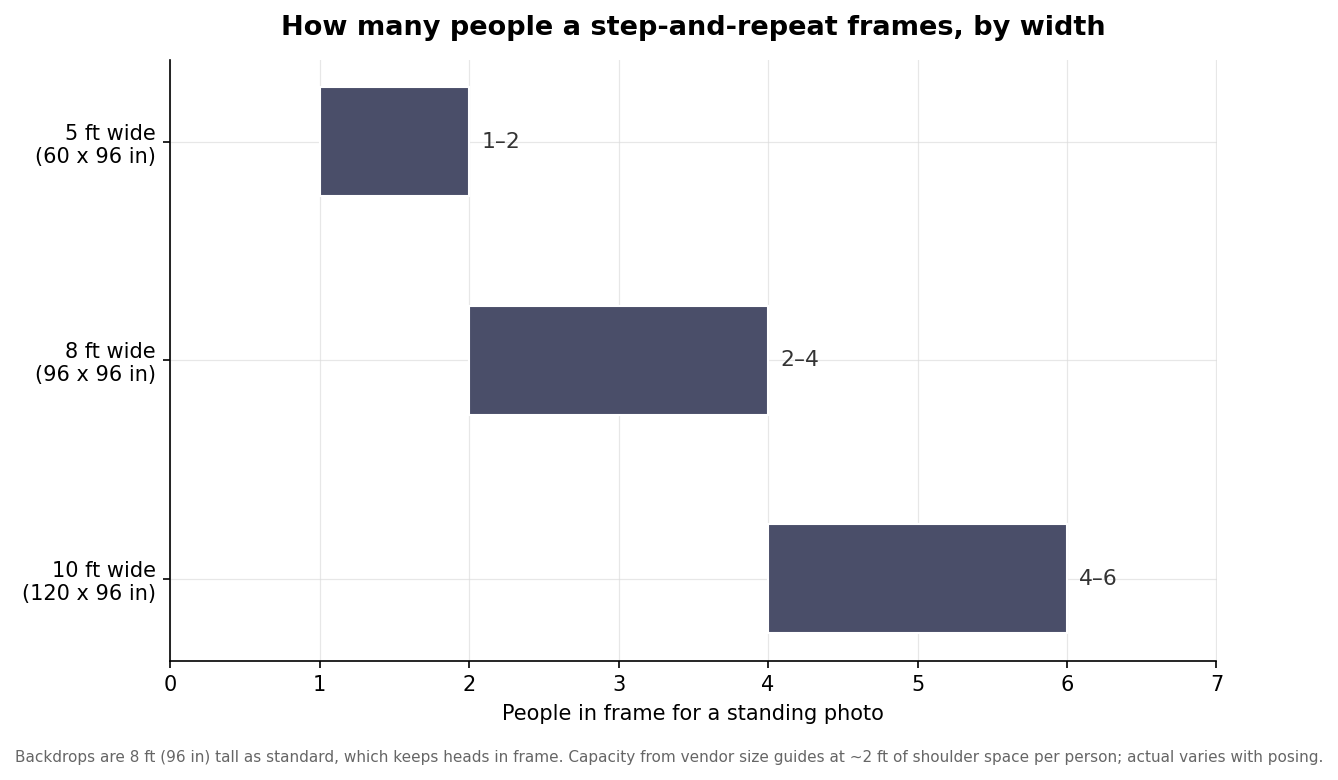
Adjustable stands cover a band of widths and heights, and you want the band to bracket your banner so you can pull the graphic taut without either stretching it or leaving slack. The height number to aim for is 8 feet, which is 96 inches and the reason most step-and-repeats are printed exactly that tall: an 8-foot top edge sits above head height, so standing subjects are not decapitated by the frame in the photo. Width is the dimension you scale to the crowd. A 5-foot-wide face suits solo shots and interviews, an 8-foot face holds a small group, and a 10-foot face frames a larger cluster for stage and media use. The chart below shows the rough people count each width carries.
When you are between widths, size up. It is far easier to leave a little empty backdrop on the edges of a photo than to squeeze one more person into a frame that cuts them off, and the extra width also gives your logos more repetitions in the shot, which is the entire point of a step-and-repeat.
Tension and wrinkles decide whether it reads as professional
However you print it, even tension across the whole width is what removes the sag that photographs so badly. On a vinyl banner, grommets around the perimeter let you attach to the frame with bungee balls or zip ties; work opposite corners in turn and pull evenly rather than tightening one side fully first, which is how you introduce diagonal ripples. Vinyl also holds a curl from being rolled, so unroll it well ahead of the event and, between uses, store it rolled rather than folded, because a crease down the middle of a logo does not steam out easily. Fabric backdrops slip over the frame like a tight pillowcase and give the smoothest face of any option; light wrinkles relax with a handheld steamer, and the cardinal rule is never to fold fabric, only roll it. A few minutes spent getting tension right is the difference between a backdrop that looks installed and one that looks draped.
Kill the glare and set the distance
The single biggest anti-glare decision happens before the event, at the order stage: choose a matte finish. Glossy vinyl bounces camera flash and overhead lighting straight back into the lens, and a hotspot across your logos cannot be fixed on site. With a matte print in hand, the on-site moves are about angles. Keep flashes and event lights off-axis, roughly 45 degrees to the backdrop rather than pointed straight at it, so any residual reflection travels away from the camera instead of into it. Watch for overhead venue spotlights that can burn a bright patch onto the top of the graphic, and reposition the stand a foot or two if you see one.
Then move the people forward. Subjects standing a couple of feet in front of the backdrop, rather than pressed against it, let their own shadows fall low and behind them instead of onto the logos, and the small gap keeps both the person and the print within the camera’s depth of field so neither goes soft. That single step, literally a step off the wall, cleans up more event photos than any lighting gear.
A five-minute check before the doors open
Run the same short pass every time. Confirm the stand’s range brackets your banner and set the top edge to about 8 feet. Tension the graphic evenly and sight down it for sag or ripples. Check that the finish is matte and that no fixed venue light is hotspotting the surface. Angle any lighting you control off-axis, and mark a spot on the floor a couple of feet out where subjects should stand. Keep a small kit on hand, spare zip ties and bungee balls, a lint roller, and a travel steamer, because the failures that happen during an event are almost always a snapped tie or a stubborn wrinkle, and both are ninety-second fixes if you brought the parts.
Leave a Reply