Category: Uncategorized

  • Step and Repeat Stands and Setup: Getting the Backdrop Tall, Tight, and Glare-Free

    Step and Repeat Stands and Setup: Getting the Backdrop Tall, Tight, and Glare-Free

    The printed banner is only half of a step-and-repeat. The other half is the stand holding it up and the ten minutes of setup before the first photo, and that half is where good artwork quietly gets ruined. A backdrop that sags in the middle, sits too low so heads clip the top edge, or throws flash glare back at the camera will show that flaw in every single frame, no matter how sharp the logos are. The fix is not more money on the print; it is choosing the right stand, sizing it to the banner, and rigging it with a little care. Here is how to do all three.

    The stand is the part people forget to budget for

    Four systems cover almost every event. Adjustable telescopic stands are the workhorses: their poles extend in both width and height, so one stand handles a range of banner sizes and venue footprints, which is exactly what you want if you run recurring events in different rooms. Pipe-and-base systems use heavy aluminum bases and are the sturdiest option for large or tall backdrops that need to stand still in a busy space or a light breeze. Pop-up frames attach the graphic with velcro and go up in minutes, so they win when portability and speed matter more than maximum size. Tension fabric stands stretch a printed fabric over a frame for a smooth, wrinkle-free face with no hardware showing.

    Price tracks size more than anything else. Within one vendor’s telescopic line, an 8-by-8-foot stand runs around $275, an 8-by-10 around $385, and an 8-by-12 around $505, so widening the backdrop by two feet at a time adds roughly a hundred dollars to the hardware. Treat those as indicative, but budget the stand as a real line item rather than an afterthought, because a cheap stand under a good banner is the most common way the whole setup looks amateur.
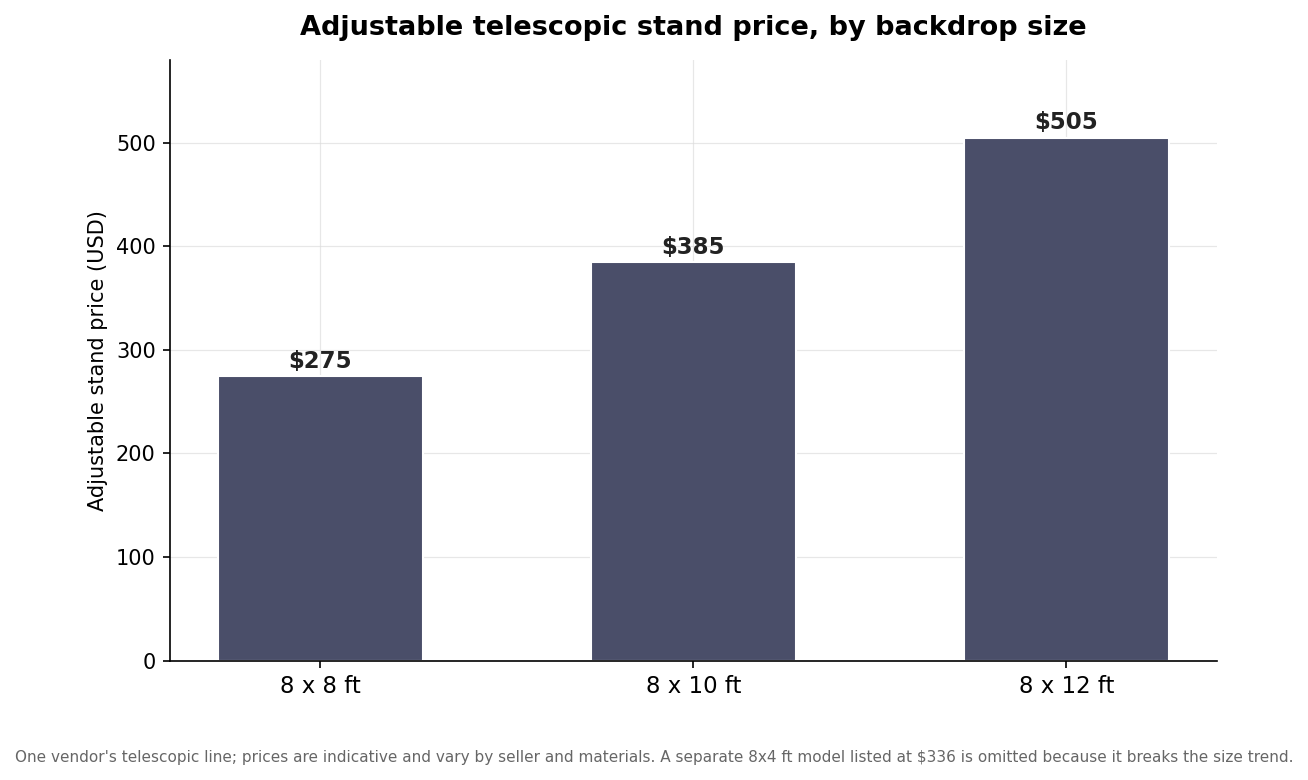
    Bar chart of adjustable telescopic stand price by backdrop size: 8 by 8 ft about $275, 8 by 10 ft about $385, 8 by 12 ft about $505
    Adjustable stand price climbs with size; figures are one vendor’s indicative telescopic pricing.

    Size the stand to the print, with range to spare

    Adjustable stands cover a band of widths and heights, and you want the band to bracket your banner so you can pull the graphic taut without either stretching it or leaving slack. The height number to aim for is 8 feet, which is 96 inches and the reason most step-and-repeats are printed exactly that tall: an 8-foot top edge sits above head height, so standing subjects are not decapitated by the frame in the photo. Width is the dimension you scale to the crowd. A 5-foot-wide face suits solo shots and interviews, an 8-foot face holds a small group, and a 10-foot face frames a larger cluster for stage and media use. The chart below shows the rough people count each width carries.
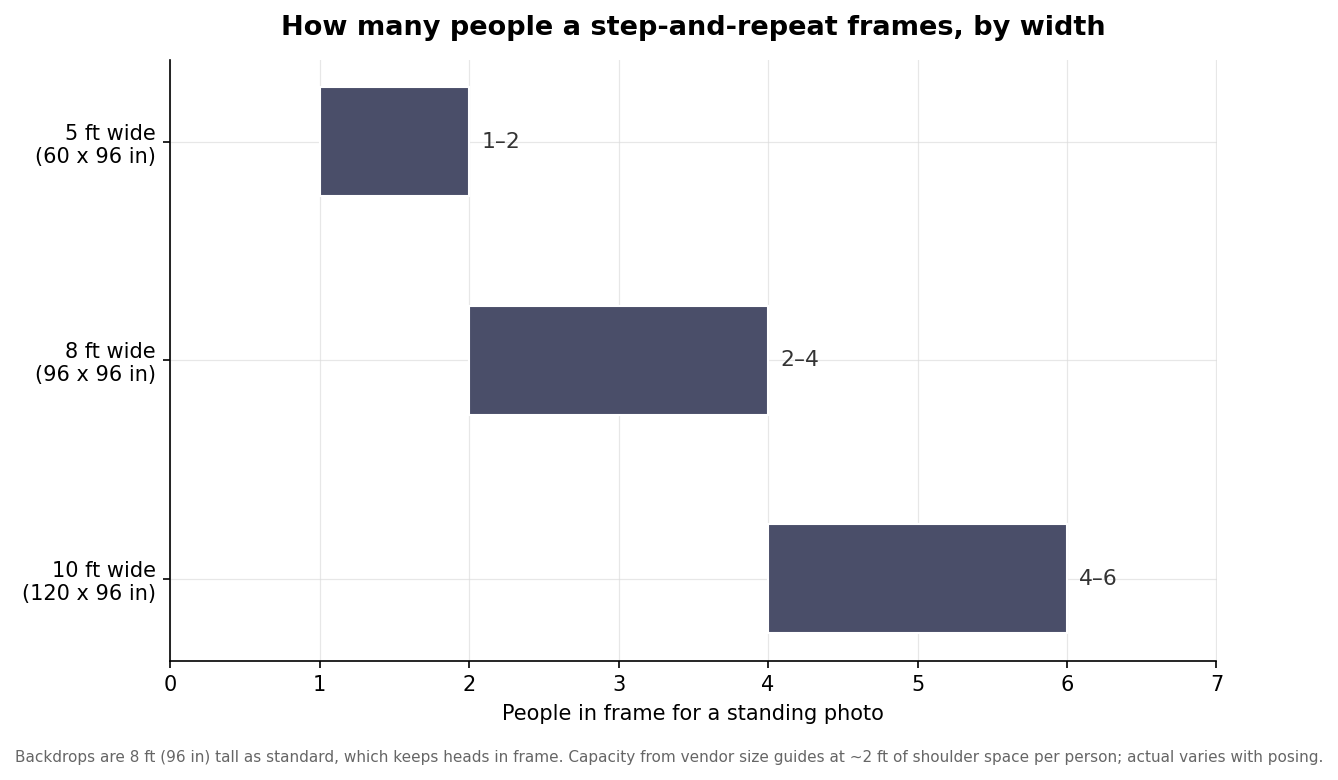
    Horizontal range bars showing how many people fit in front of a step-and-repeat by backdrop width: 5 ft wide fits 1 to 2, 8 ft wide fits 2 to 4, 10 ft wide fits 4 to 6
    People capacity rises with backdrop width; all are 8 ft tall as standard so heads stay in frame.

    When you are between widths, size up. It is far easier to leave a little empty backdrop on the edges of a photo than to squeeze one more person into a frame that cuts them off, and the extra width also gives your logos more repetitions in the shot, which is the entire point of a step-and-repeat.

    Tension and wrinkles decide whether it reads as professional

    However you print it, even tension across the whole width is what removes the sag that photographs so badly. On a vinyl banner, grommets around the perimeter let you attach to the frame with bungee balls or zip ties; work opposite corners in turn and pull evenly rather than tightening one side fully first, which is how you introduce diagonal ripples. Vinyl also holds a curl from being rolled, so unroll it well ahead of the event and, between uses, store it rolled rather than folded, because a crease down the middle of a logo does not steam out easily. Fabric backdrops slip over the frame like a tight pillowcase and give the smoothest face of any option; light wrinkles relax with a handheld steamer, and the cardinal rule is never to fold fabric, only roll it. A few minutes spent getting tension right is the difference between a backdrop that looks installed and one that looks draped.

    Kill the glare and set the distance

    The single biggest anti-glare decision happens before the event, at the order stage: choose a matte finish. Glossy vinyl bounces camera flash and overhead lighting straight back into the lens, and a hotspot across your logos cannot be fixed on site. With a matte print in hand, the on-site moves are about angles. Keep flashes and event lights off-axis, roughly 45 degrees to the backdrop rather than pointed straight at it, so any residual reflection travels away from the camera instead of into it. Watch for overhead venue spotlights that can burn a bright patch onto the top of the graphic, and reposition the stand a foot or two if you see one.

    Then move the people forward. Subjects standing a couple of feet in front of the backdrop, rather than pressed against it, let their own shadows fall low and behind them instead of onto the logos, and the small gap keeps both the person and the print within the camera’s depth of field so neither goes soft. That single step, literally a step off the wall, cleans up more event photos than any lighting gear.

    A five-minute check before the doors open

    Run the same short pass every time. Confirm the stand’s range brackets your banner and set the top edge to about 8 feet. Tension the graphic evenly and sight down it for sag or ripples. Check that the finish is matte and that no fixed venue light is hotspotting the surface. Angle any lighting you control off-axis, and mark a spot on the floor a couple of feet out where subjects should stand. Keep a small kit on hand, spare zip ties and bungee balls, a lint roller, and a travel steamer, because the failures that happen during an event are almost always a snapped tie or a stubborn wrinkle, and both are ninety-second fixes if you brought the parts.
  • Laying Out a Step-and-Repeat: Logo Size, Spacing, and Print-Ready Art

    Laying Out a Step-and-Repeat: Logo Size, Spacing, and Print-Ready Art

    A step-and-repeat backdrop earns its keep in other people’s photos. Every guest who poses in front of it becomes a small billboard, but only if the logos are the right size, spaced so the camera catches a few of them cleanly, and built as artwork a large-format printer can actually reproduce. Sizing the banner is the easy part; laying out the repeat is where most backdrops are won or lost. Here is how to set up the pattern and the file so your brand reads in the frame instead of turning into wallpaper.

    Size the Logo to the Backdrop

    Start with how wide each logo should be, then let the banner size scale it. As a working range, individual logos on a step-and-repeat usually sit somewhere between 6 and 12 inches wide. On a standard 8-by-8-foot backdrop, 8 to 10 inches wide keeps the mark readable without crowding; on a 10-by-10-foot or larger wall, 10 to 12 inches holds the same visual weight across the bigger field. The instinct to make the logo bigger so people can see it usually backfires, because oversized logos mean fewer repetitions and a greater chance that a tight photo crop lands on blank space between them. Scale the logo proportionally to the banner rather than picking a size in isolation.

    Space It Like Checkers

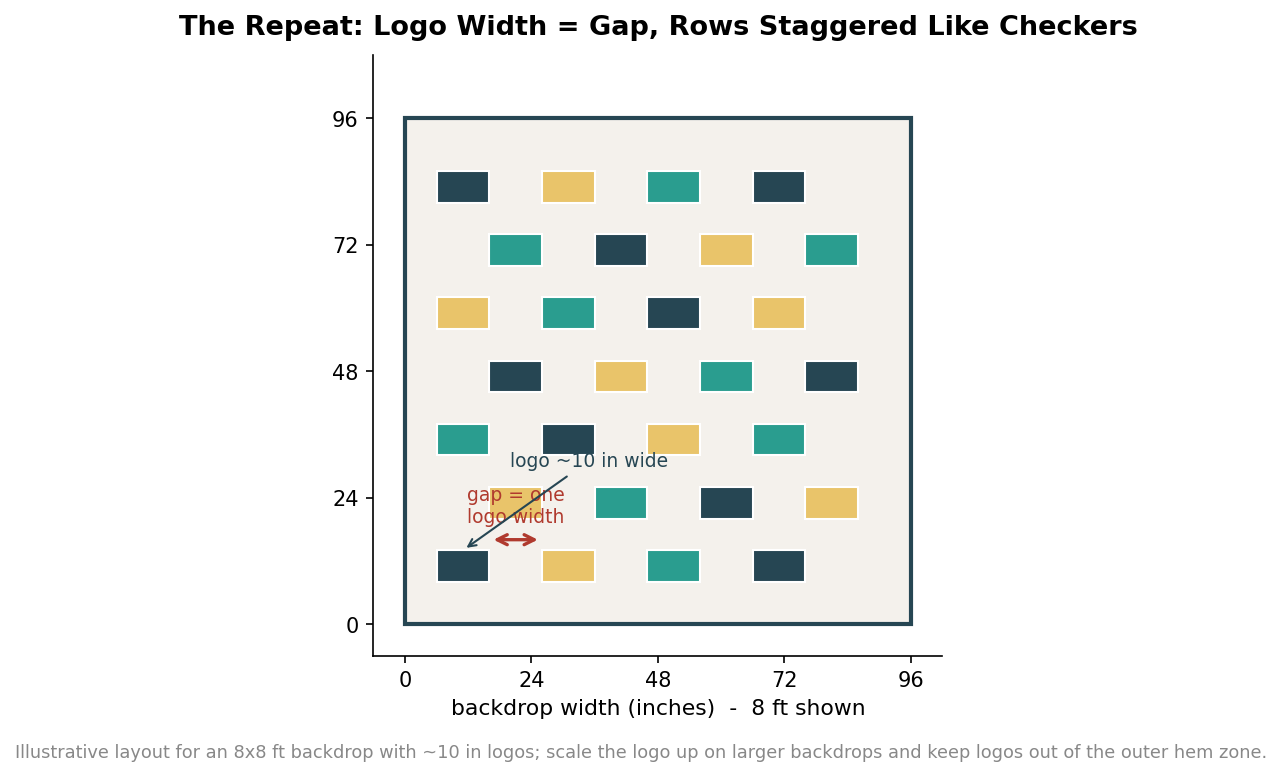
    The spacing rule is simpler than it looks: leave about one logo’s width of gap between repetitions. If your logo is 8 inches wide, put roughly 8 inches of space before the next one, and use the same measure for the vertical gaps between rows. Then offset every other row by half a step so the logos fall in a staggered, checkers-style pattern rather than a rigid grid. The stagger matters for a practical reason: when a guest stands in front of the wall, their body blocks part of it, and a staggered pattern keeps whole logos visible on either side of them instead of leaving a column of half-hidden marks. Consistent gaps equal to the logo width keep the whole field balanced no matter where the camera crops.

    Diagram of an 8 by 8 foot step-and-repeat backdrop showing roughly 10-inch logos spaced one logo-width apart in a staggered, checkers-style pattern
    Leave a gap equal to one logo width and stagger every other row so whole logos stay visible beside each guest.

    Design for the Camera, Not the Wall

    Judge the layout by what a phone camera sees from a few feet away, not by the full flat banner. A typical posed photo captures only a portion of the backdrop behind the subjects, so aim for at least two to three complete logos to be visible in that crop, from head height down to the waist. Keep the logos clear of the outer edge of the banner, because the hem, pole pockets or the frame’s border can swallow anything printed too close to the perimeter, and a face-level row of logos is worth more than one near the floor where it will be hidden by legs. Contrast counts too: a logo that is legible on screen at full size can vanish against a busy or low-contrast background once it is printed large and lit by a camera flash, so favor clean, high-contrast lockups. If you are alternating two brand marks, or a logo and an event hashtag, keep their visual weights similar so neither one disappears in the pattern.

    Match the Backdrop Size to the Crowd

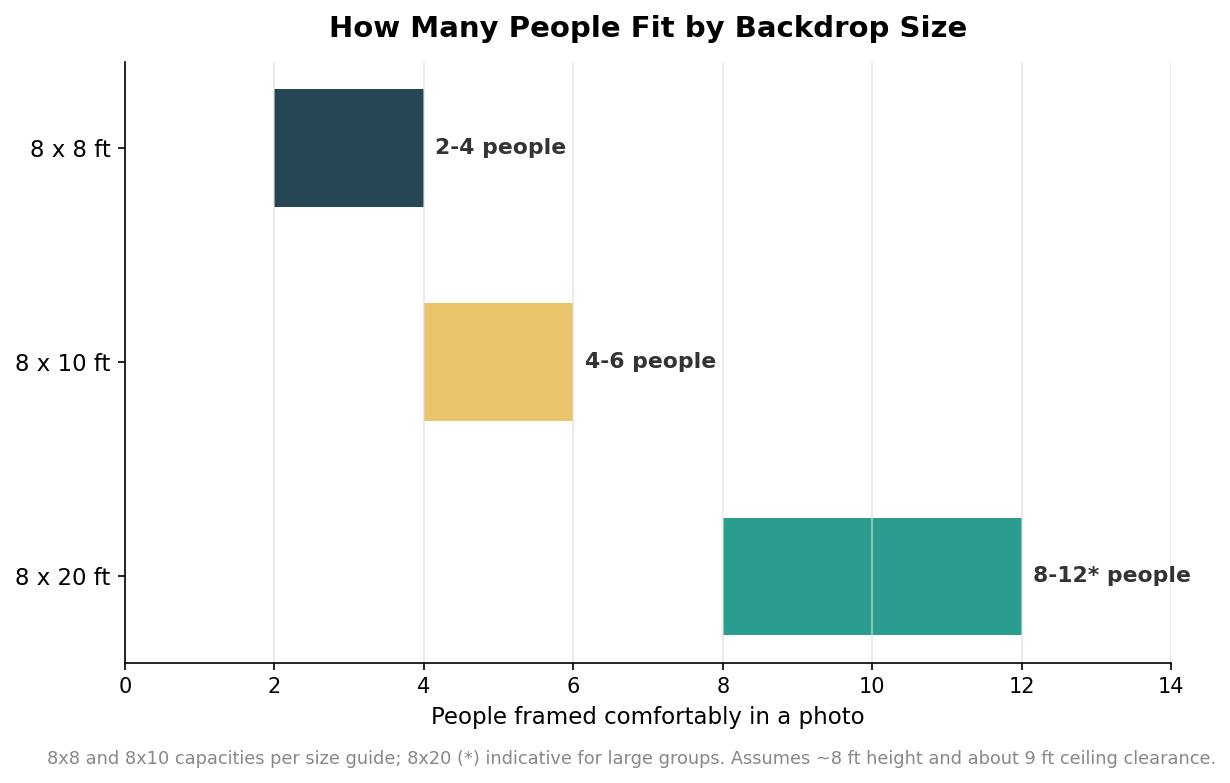
    Choose the banner footprint for the group you expect in a single shot. An 8-by-8-foot backdrop frames individuals, couples and small groups of two to four people and fits comfortably in compact spaces like hotel ballrooms and retail floors. An 8-by-10-foot wall opens that up to roughly four to six people with room for more dramatic poses, and wider formats are used when you need to fit larger groups or run a true red-carpet line. Two logistics decide whether the size you want will actually work on site: ceiling height and stand footprint. Plan on at least about nine feet of ceiling clearance for a standard eight-foot backdrop, and remember the adjustable stand behind it typically spans seven to ten feet wide and needs floor space of roughly ten by ten or ten by twelve feet once the feet are out. Confirm the room before you confirm the size.

    Range bar chart of people capacity by backdrop size: 8 by 8 feet fits 2 to 4 people, 8 by 10 feet fits 4 to 6, and an indicative 8 to 12 for 8 by 20 feet
    Pick the footprint for the group you expect in one shot, then confirm ceiling height and stand clearance.

    Build Print-Ready Artwork

    The last step is handing the printer a file that survives being blown up to wall size. Supply the logo as vector art wherever possible, because vector marks stay crisp at any scale where a small raster logo would turn to mush. If you must use a raster image, build the artwork at the final dimensions and check that it holds up; large-format graphics are viewed from a distance, so they are commonly designed at reduced scale with the resolution set to still resolve cleanly at full size, but a tiny web logo stretched to ten inches will look ragged no matter what. Add the bleed and finishing allowance your printer specifies, keep all logos and any text inside a safe margin so nothing critical lands in the hem or grommet zone, and set the file up in the correct color space so your brand colors do not shift on the press. Then proof the full pattern at one hundred percent on screen, and ideally check a small physical sample, before committing the whole run. The goal is a file that needs no rescue on the print floor.

    A backdrop that works is really just three good decisions stacked together: logos sized to the wall, spaced a logo-width apart in a staggered pattern, and delivered as clean, print-ready art with room to spare at the edges. Get the layout right and the size right for the crowd, and every photo taken in front of it does exactly what you built it to do, which is carry your brand into someone else’s feed looking sharp.

  • Step and Repeat Mistakes That Ruin the Photos (and How to Avoid Them)

    Step and Repeat Mistakes That Ruin the Photos (and How to Avoid Them)

    A step and repeat backdrop has exactly one job: make everyone who poses in front of it look good while your logo rides along in every photo that gets posted. When it falls short, it does so in ways that are painfully visible the next day, when reshooting is impossible. Almost all of those failures trace back to a handful of decisions made before anything was printed. Here are the mistakes worth catching in advance.

    Sizing the logos wrong

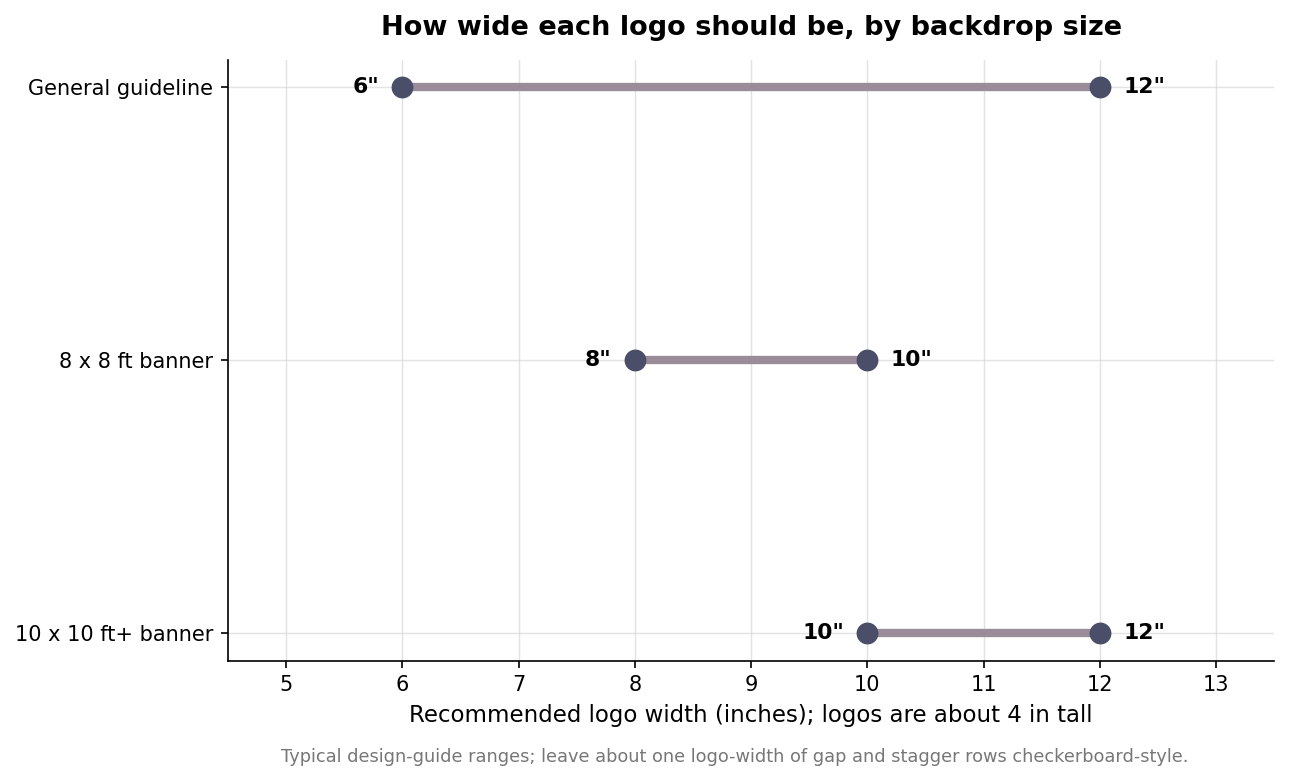
    The logo size is the setting people most often get backward. Make the logos too large and only one or two land in a cropped photo, so the wall looks sparse and oddly branded. Make them too small and they blur into unreadable texture once the image is cropped to faces. The workable range is roughly 6 to 12 inches wide and about 4 inches tall. On an 8 by 8 foot banner, aim for 8 to 10 inch logos; on a 10 by 10 or larger wall, go 10 to 12 inches. Leave about one logo’s width of gap between repeats and stagger the rows in a checkerboard so that any tight crop still catches at least one complete, legible mark. If you are placing more than one sponsor or brand on the wall, set a clear hierarchy rather than repeating them at equal size: a dominant primary logo with smaller secondary marks reads far better in a photo than a busy grid of competing logos, all of which end up illegible.

    Dot plot of recommended logo width: general 6 to 12 inches, 8x8 banner 8 to 10 inches, 10x10 plus banner 10 to 12 inches
    Recommended logo widths by backdrop size, with about one logo-width of spacing between repeats.

    Ordering a glossy finish for a room full of flashes

    Finish is a quiet decision with loud consequences. A glossy banner bounces camera flash and bright spotlights straight back into the lens, producing white hot spots that wash out whatever logo happens to sit behind the subject. A matte finish scatters that light and keeps the backdrop reading cleanly in every frame. For any event with flash photography, a media wall, or strong overhead lighting, order matte and do not overthink it. Glossy only earns its place in a controlled setting with soft, indirect light, which describes almost no real event. Material affects sheen too: tension fabric is naturally low-glare and forgiving under mixed lighting, while a standard vinyl banner tends to be shinier, so if you are set on vinyl, ask specifically for a matte or satin laminate rather than assuming the default finish will behave.

    Buying the wrong size for the crowd

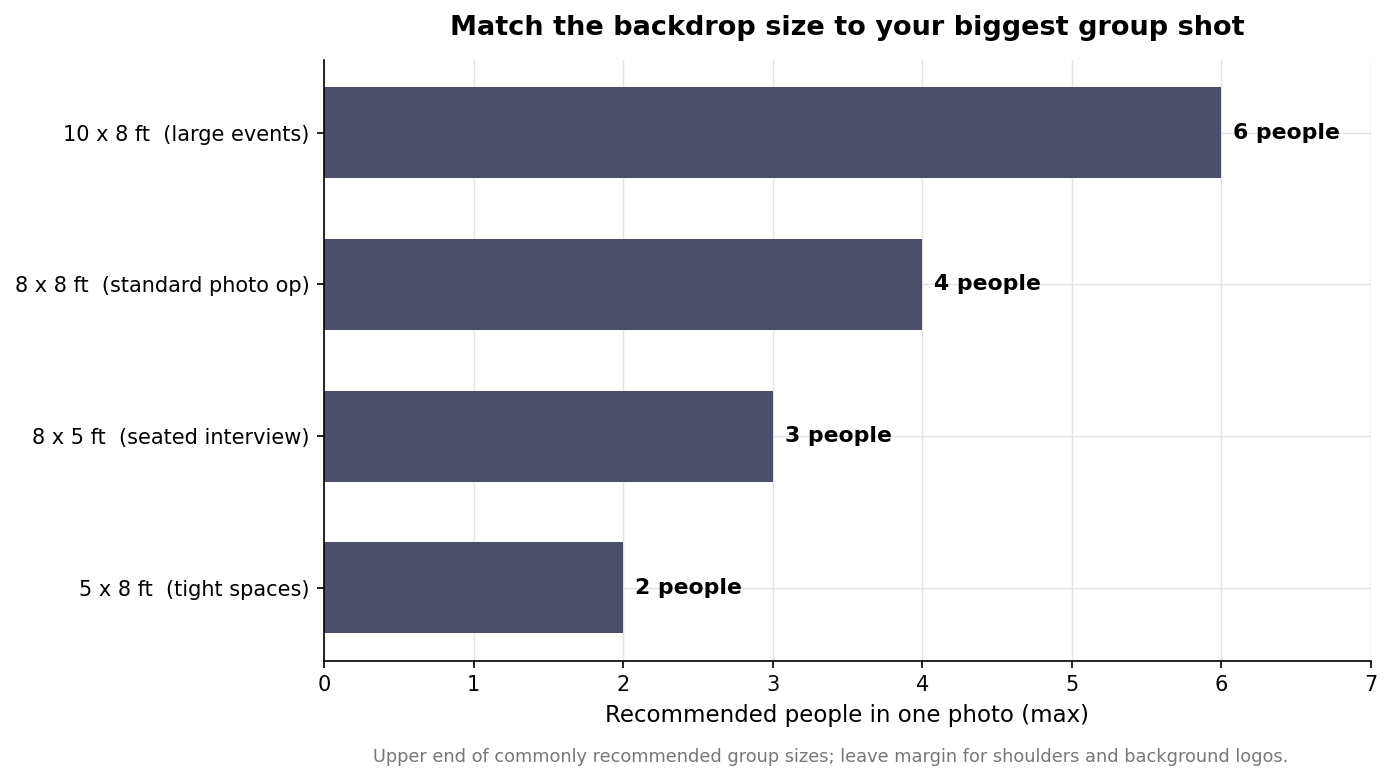
    Backdrops are sold in a few standard footprints, and each one has an honest capacity. An 8 by 8 foot wall frames two to four people; a 10 by 8 handles four to six; a 5 by 8 suits one or two; and an 8 foot wide by 5 foot tall layout works for two to three seated guests. Height matters as much as width: an 8 foot tall banner keeps heads below the top edge for standing photos, while a 5 foot tall banner actually photographs better behind a seated interview because it does not tower awkwardly. The classic error is an 8 by 8 backdrop for a six-person grip-and-grin, which crops shoulders and buries the background logos. Size for the largest single group you expect in one shot, then add a little margin. Remember the photographer needs room to work: a tight venue that forces them close to the wall with a wide lens will stretch faces at the edges, so a slightly larger backdrop that lets people stand a step forward, away from the print, usually photographs better than one sized to the exact group.

    Horizontal bar chart of recommended group size per backdrop: 10x8 ft six people, 8x8 ft four, 8x5 ft three seated, 5x8 ft two
    Each standard backdrop size has an honest capacity; size for your biggest single group shot.

    Sending artwork that cannot hold up at eight feet

    Artwork built for the web falls apart at banner scale. Design at the final print size and supply vector art or high-resolution raster so the logos stay crisp when someone stands three feet away. Include the bleed your printer specifies, convert fonts to outlines so nothing reflows, and work in the color space the shop asks for so brand colors do not drift. Pay special attention to the vertical band from roughly waist to head height, where people actually stand: keep the repeat even and complete through that zone so a half-hidden body does not leave an awkward blank next to someone’s face. Send the file in the format your printer requests, usually a press-ready PDF or a native vector file, and always order or approve a proof at scale; a logo that looks fine on a laptop can reveal a low-resolution edge or a color shift only once it is blown up to wall size.

    Forgetting the stand, the lights, and the wind

    The print is only half the setup. Order an adjustable stand rated for the banner’s size, and choose the substrate deliberately: tension fabric resists wrinkles and travels well, while vinyl is more rigid and usually cheaper but shows creases from folding. Plan the lighting to hit the wall evenly from the front so you are not fighting shadows. And if any part of the event is outdoors, treat wind as the real threat, because a vinyl banner behaves like a sail; weighted or staked bases and a fabric that lets some air through will save the shot. Build in setup time as well: a tension-fabric wall pushes onto its frame in minutes, while a large vinyl banner needs careful hanging to pull out the folds, and neither is something you want to be fighting fifteen minutes before doors open. Walk through logo size, finish, footprint, artwork, and hardware before you approve the proof, and the backdrop will do its one job all night.

  • What Size Step and Repeat Backdrop Do You Need?

    What Size Step and Repeat Backdrop Do You Need?

    July 8, 2026 ยท Ordering

    The most common question we get is also the simplest to answer once you know how many people need to fit in frame. Backdrop size is driven by how many subjects photograph at once and how far back the photographer can stand.

    Here is a quick reference for the three most common scenarios.

    Sizing by use

    ScenarioRecommended size
    Solo / headshot press line6×8 ft
    2โ€“4 person group photo8×8 ft
    Red carpet / full media wall8×10 ft or wider

    A few rules of thumb

    Leave roughly two feet of branded backdrop beyond the widest group so no one steps outside the logo field. Taller backdrops (8 ft) keep logos visible above heads in a standing group shot. When in doubt, size up โ€” an oversized wall always photographs better than a cramped one.

    Get a quoteReady to build yours? Get a custom quote and we’ll send mockups within one business day.

    Get a Quote

  • Tension Fabric vs. Vinyl: Choosing a Step and Repeat Material

    Tension Fabric vs. Vinyl: Choosing a Step and Repeat Material

    June 24, 2026 ยท Buyer guides

    Both materials print in full color and both make a professional backdrop. The choice comes down to finish, durability, and budget.

    Side by side

    Tension fabricVinyl
    FinishMatte, wrinkle-free, glare-freeMatte, can show minor ripples
    Best forRed carpet, flash photographyTrade shows, frequent reuse, budget
    DurabilityExcellent, folds without creasingExcellent, wipes clean
    CostHigherLower

    The short version

    Choose tension fabric when the photo quality is the whole point โ€” a gala, a premiere, a flash-heavy red carpet. Choose vinyl when durability and cost drive the decision, or when you need several banners at once for multiple booths or a recurring event.

    Get a quoteReady to build yours? Get a custom quote and we’ll send mockups within one business day.

    Get a Quote

  • How to Plan a Red Carpet Entrance for Your Event

    How to Plan a Red Carpet Entrance for Your Event

    June 10, 2026 ยท Red Carpet

    A memorable arrival is more than a backdrop. It is a coordinated sequence โ€” carpet, wall, barrier, and light โ€” that guides guests into a frame worth photographing.

    The four elements

    The wall. A full-width media wall, 10×8 ft or larger, with your logo pattern repeated edge to edge. The carpet. A runner in your palette that defines the path and signals “this way.” The stanchions. Rope-and-post barriers that keep the line orderly and the frame clean. The light. Even front light so faces read and the logo pattern stays legible.

    Flow

    StepDetail
    1. ApproachCarpet leads guests toward the wall
    2. PauseA marked spot 6โ€“8 ft from the wall
    3. PhotoPhotographer frames the branded wall behind

    Our Red Carpet Media Wall Package ships all four physical elements coordinated to your brand in one order.

    Get a quoteReady to build yours? Get a custom quote and we’ll send mockups within one business day.

    Get a Quote